Hout Bay Gem: Main Photos
Hout Bay Gem: Main Photos
Hout Bay Gem: Main Photos
Hout Bay Gem: Main Photos
Hout Bay Gem: Main Photos
Hout Bay Gem: Main Photos
Hout Bay Gem: Main Photos
Hout Bay Gem: Main Photos
Hout Bay Gem: Main Photos
Hout Bay Gem: Main Photos
Hout Bay Gem: Main Photos
Hout Bay Gem: Main Photos
Hout Bay Gem: Main Photos
Hout Bay Gem: Main Photos
Hout Bay Gem: Main Photos
Hout Bay Gem: Main Photos
Hout Bay Gem: Main Photos
Hout Bay Gem: Main Photos
Hout Bay Gem: Main Photos
Hout Bay Gem: Main Photos
Hout Bay Gem: Main Photos
Hout Bay Gem: Main Photos
Hout Bay Gem: Main Photos
Hout Bay Gem: Main Photos
Hout Bay Gem: Main Photos
Hout Bay Gem: Main Photos
Hout Bay Gem: Main Photos
Hout Bay Gem: Main Photos
Hout Bay Gem: Main Photos
Hout Bay Gem: Main Photos
Hout Bay Gem: Main Photos
Hout Bay Gem: Main Photos
Hout Bay Gem: Main Photos
Hout Bay Gem: Main Photos
Hout Bay Gem: Main Photos
Hout Bay Gem: Main Photos
Hout Bay Gem: Main Photos
Hout Bay Gem: Main Photos
Hout Bay Gem: Main Photos
Hout Bay Gem: Main Photos
Hout Bay Gem: Main Photos
Hout Bay Gem: Main Photos
Hout Bay Gem: Main Photos
Hout Bay Gem: Main Photos
Hout Bay Gem: Main Photos
Hout Bay Gem: Main Photos
Hout Bay Gem: Main Photos
Hout Bay Gem: Main Photos
Hout Bay Gem: Main Photos
Hout Bay Gem: Main Photos
Hout Bay Gem: Main Photos
Hout Bay Gem: Main Photos
Hout Bay Gem: Main Photos
Hout Bay Gem: Main Photos
Hout Bay Gem: Main Photos
Hout Bay Gem: Main Photos
Hout Bay Gem: Main Photos
Hout Bay Gem: Main Photos
Hout Bay Gem: Main Photos
Hout Bay Gem: Main Photos
Hout Bay Gem: Main Photos
Hout Bay Gem: Main Photos
Hout Bay Gem: Main Photos
Hout Bay Gem: Main Photos
Hout Bay Gem: Main Photos
Hout Bay Gem: Main Photos
Hout Bay Gem: Main Photos
Hout Bay Gem: Main Photos
Hout Bay Gem: Main Photos
Hout Bay Gem: Main Photos
Hout Bay Gem: Main Photos
Hout Bay Gem: Main Photos
Hout Bay Gem: Main Photos
Hout Bay Gem: Main Photos
Hout Bay Gem: Main Photos
Hout Bay Gem: Main Photos
Hout Bay Gem: Main Photos
Hout Bay Gem: Main Photos
Hout Bay Gem: Main Photos
Hout Bay Gem: Main Photos
Hout Bay Gem: Main Photos
Hout Bay Gem: Main Photos
Hout Bay Gem: Main Photos
Hout Bay Gem: Main Photos
Hout Bay Gem: Main Photos
Hout Bay Gem: Main Photos
Hout Bay Gem: Main Photos
Hout Bay Gem: Main Photos
Hout Bay Gem: Main Photos
Hout Bay Gem: Main Photos
Hout Bay Gem: Main Photos
Hout Bay Gem: Main Photos
Hout Bay Gem: Main Photos
Hout Bay Gem: Main Photos
Hout Bay Gem: Main Photos
Hout Bay Gem: Main Photos
Hout Bay Gem: Main Photos
Hout Bay Gem: Main Photos
Hout Bay Gem: Main Photos
Hout Bay Gem: Main Photos
Hout Bay Gem: Main Photos
Hout Bay Gem: Main Photos
Hout Bay Gem: Main Photos
Hout Bay Gem: Main Photos
Hout Bay Gem: Main Photos
Hout Bay Gem: Main Photos
Hout Bay Gem: Main Photos
Hout Bay Gem: Main Photos
Hout Bay Gem: Main Photos
Hout Bay Gem: Main Photos
Hout Bay Gem: Main Photos
Hout Bay Gem: Main Photos
Hout Bay Gem: Main Photos
Hout Bay Gem: Main Photos
Hout Bay Gem: Main Photos
Hout Bay Gem: Main Photos
Hout Bay Gem: Main Photos
Hout Bay Gem: Main Photos
Hout Bay Gem: Main Photos
Hout Bay Gem: Main Photos
Hout Bay Gem: Main Photos
Hout Bay Gem: Main Photos
Hout Bay Gem: Main Photos
Hout Bay Gem: Main Photos
Hout Bay Gem: Main Photos
Hout Bay Gem: Main Photos
Hout Bay Gem: Main Photos
Hout Bay Gem: Main Photos
Hout Bay Gem: Main Photos
Hout Bay Gem: Main Photos
Hout Bay Gem: Main Photos
Hout Bay Gem: Main Photos
Hout Bay Gem: Main Photos
Hout Bay Gem: Main Photos
Hout Bay Gem: Main Photos
Hout Bay Gem: Main Photos
Hout Bay Gem: Main Photos
Hout Bay Gem: Main Photos
Hout Bay Gem: Main Photos
Hout Bay Gem: Main Photos
Hout Bay Gem: Main Photos
Hout Bay Gem: Main Photos
Hout Bay Gem: Main Photos
Hout Bay Gem: Main Photos
Hout Bay Gem: Main Photos
Hout Bay Gem: Main Photos
Hout Bay Gem: Main Photos
Hout Bay Gem: Main Photos
Hout Bay Gem: Main Photos
Hout Bay Gem: Main Photos
Hout Bay Gem: Main Photos
Hout Bay Gem: Main Photos
Hout Bay Gem: Main Photos
Hout Bay Gem: Main Photos
Hout Bay Gem: Main Photos
Hout Bay Gem: Main Photos
Hout Bay Gem: Main Photos
Hout Bay Gem: Main Photos
Hout Bay Gem: Main Photos
Hout Bay Gem: Main Photos
Hout Bay Gem: Main Photos
Hout Bay Gem: Main Photos
Hout Bay Gem: Main Photos
Hout Bay Gem: Main Photos
Hout Bay Gem: Main Photos
Hout Bay Gem: Main Photos
Hout Bay Gem: Main Photos
Hout Bay Gem: Main Photos
Hout Bay Gem: Main Photos
Hout Bay Gem: Main Photos
Hout Bay Gem: Main Photos
Hout Bay Gem: Main Photos
Hout Bay Gem: Main Photos
Hout Bay Gem: Main Photos
Hout Bay Gem: Main Photos
Hout Bay Gem: Main Photos
Hout Bay Gem: Main Photos
Hout Bay Gem: Main Photos
Hout Bay Gem: Main Photos
Hout Bay Gem: Main Photos
Hout Bay Gem: Main Photos
Hout Bay Gem: Main Photos
Hout Bay Gem: Main Photos
Hout Bay Gem: Main Photos
Hout Bay Gem: Main Photos
Hout Bay Gem: Main Photos
Hout Bay Gem: Main Photos
Hout Bay Gem: Main Photos
Hout Bay Gem: Main Photos
Hout Bay Gem: Main Photos
Hout Bay Gem: Main Photos
Hout Bay Gem: Main Photos
Hout Bay Gem: Main Photos
Hout Bay Gem: Main Photos
Hout Bay Gem: Main Photos
Hout Bay Gem: Main Photos
Hout Bay Gem: Main Photos
Hout Bay Gem: Main Photos
Hout Bay Gem: Main Photos
Hout Bay Gem: Main Photos
Hout Bay Gem: Main Photos
Hout Bay Gem: Main Photos
Hout Bay Gem: Main Photos
Hout Bay Gem: Main Photos
Hout Bay Gem: Main Photos
Hout Bay Gem: Main Photos
Hout Bay Gem: Main Photos
Hout Bay Gem: Deluxe Room 1
Hout Bay Gem: Deluxe Room 1
Hout Bay Gem: Deluxe Room 1
Hout Bay Gem: Deluxe Room 1
Hout Bay Gem: Deluxe Room 1
Hout Bay Gem: Deluxe Room 1
Hout Bay Gem: Deluxe Room 1
Hout Bay Gem: Deluxe Room 1
Hout Bay Gem: Deluxe Room 1
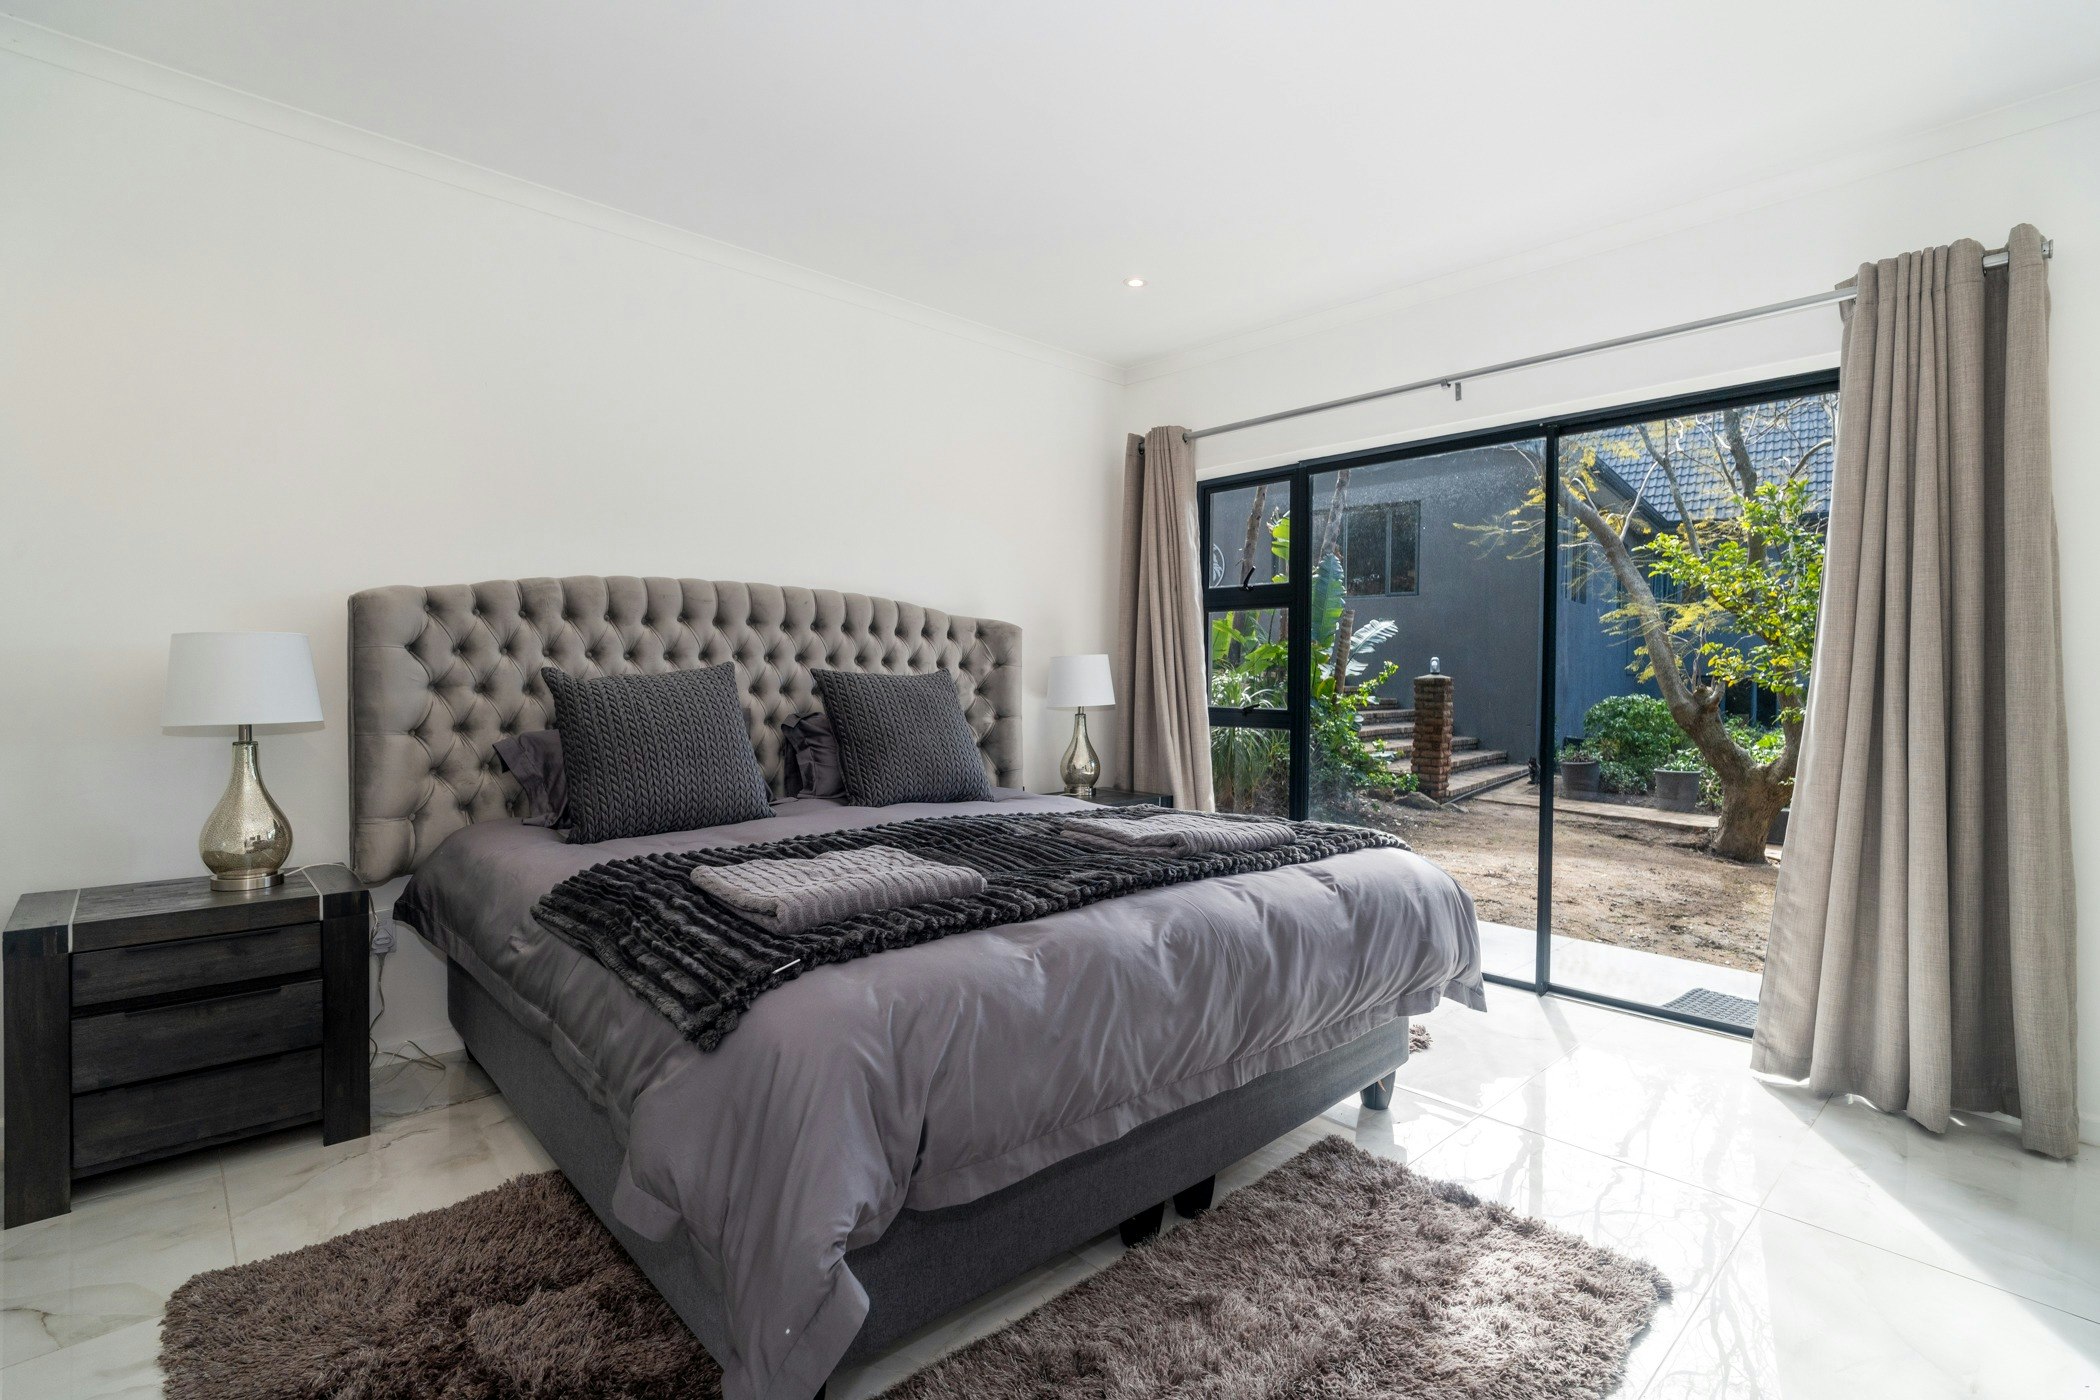
Hout Bay Gem: Luxurious Room 10
Hout Bay Gem: Luxurious Room 10
Hout Bay Gem: Luxurious Room 10
Hout Bay Gem: Luxurious Room 10
Hout Bay Gem: Luxurious Room 10
Hout Bay Gem: Luxurious Room 10
Hout Bay Gem: Luxurious Room 10
Hout Bay Gem: Luxurious Room 10
Hout Bay Gem: Luxurious Room 10
Hout Bay Gem: Luxurious Room 10
Hout Bay Gem: Luxurious Room 10
Hout Bay Gem: Luxurious Room 10
Hout Bay Gem: Luxurious Room 10
Hout Bay Gem: Luxurious Room 10
Hout Bay Gem: Luxurious Room 10
Hout Bay Gem: Luxurious Room 10
Hout Bay Gem: Luxurious Room 10
Hout Bay Gem: Luxurious Room 10
Hout Bay Gem: Luxurious Room 10
Hout Bay Gem: Luxurious Room 10
Hout Bay Gem: Luxurious Room 10
Hout Bay Gem: Deluxe Room 9 - Three bedroom downstairs
Hout Bay Gem: Deluxe Room 9 - Three bedroom downstairs
Hout Bay Gem: Deluxe Room 9 - Three bedroom downstairs
Hout Bay Gem: Deluxe Room 9 - Three bedroom downstairs
Hout Bay Gem: Deluxe Room 8 - Three bedroom downstairs
Hout Bay Gem: Deluxe Room 8 - Three bedroom downstairs
Hout Bay Gem: Deluxe Room 8 - Three bedroom downstairs
Hout Bay Gem: Deluxe Room 8 - Three bedroom downstairs
Hout Bay Gem: Deluxe Room 7 - Three bedroom downstairs
Hout Bay Gem: Deluxe Room 7 - Three bedroom downstairs
Hout Bay Gem: Deluxe Room 7 - Three bedroom downstairs
Hout Bay Gem: Deluxe Room 7 - Three bedroom downstairs
Hout Bay Gem: Deluxe loft Room 6
Hout Bay Gem: Deluxe loft Room 6
Hout Bay Gem: Deluxe loft Room 6
Hout Bay Gem: Deluxe loft Room 6
Hout Bay Gem: Deluxe loft Room 6
Hout Bay Gem: Deluxe loft Room 6
Hout Bay Gem: Modern Room 5
Hout Bay Gem: Modern Room 5
Hout Bay Gem: Modern Room 5
Hout Bay Gem: Modern Room 5
Hout Bay Gem: Modern Room 5
Hout Bay Gem: Deluxe Room 4 - King Room with En-suite
Hout Bay Gem: Deluxe Room 4 - King Room with En-suite
Hout Bay Gem: Deluxe Room 4 - King Room with En-suite
Hout Bay Gem: Deluxe Room 4 - King Room with En-suite
Hout Bay Gem: Deluxe Room 4 - King Room with En-suite
Hout Bay Gem: Deluxe Room 4 - King Room with En-suite
Hout Bay Gem: Deluxe Room 4 - King Room with En-suite
Hout Bay Gem: Deluxe Room 4 - King Room with En-suite
Hout Bay Gem: Deluxe Room 4 - King Room with En-suite
Hout Bay Gem: Deluxe Room 4 - King Room with En-suite
Hout Bay Gem: Modern Room 3 - Queen Room
Hout Bay Gem: Modern Room 3 - Queen Room
Hout Bay Gem: Modern Room 3 - Queen Room
Hout Bay Gem: Modern Room 3 - Queen Room
Hout Bay Gem: Modern Room 3 - Queen Room
Hout Bay Gem: Modern Room 3 - Queen Room
Hout Bay Gem: Modern Room 3 - Queen Room
Hout Bay Gem: Modern Room 3 - Queen Room
Hout Bay Gem: Modern Room 2 - Queen Room
Hout Bay Gem: Modern Room 2 - Queen Room
Hout Bay Gem: Modern Room 2 - Queen Room
Hout Bay Gem: Modern Room 2 - Queen Room
Hout Bay Gem: Modern Room 2 - Queen Room
Hout Bay Gem: Modern Room 2 - Queen Room
Hout Bay Gem: Modern Room 2 - Queen Room
Hout Bay Gem: Modern Room 2 - Queen Room
Hout Bay Gem: Modern Room 2 - Queen Room
Hout Bay Gem: Luxurious Room 11 -
Hout Bay Gem: Luxurious Room 11 -
Hout Bay Gem: Luxurious Room 11 -
Hout Bay Gem: Luxurious Room 11 -
Hout Bay Gem: Luxurious Room 11 -
Hout Bay Gem: Luxurious Room 11 -
Hout Bay Gem: Luxurious Room 11 -
Hout Bay Gem: Luxurious Room 11 -